
type
status
date
category
slug
summary
Pinterest Topic
Pin Title
Pinterest Tag
Facebook Post
Latest Pin Date
Latest Pin No.
Pin Image
Total Pin Images
All Pins Posted
All Pin Images Created
tags
icon
password
comment
humanize
Welcome to the Wonderful World of Furniture Flipping—Where Old Becomes Awesome
Let’s be real: We’ve all done it. Walked past a beat-up chair at a thrift store, its fabric faded like an old photo, or a dusty dresser at a garage sale, covered in who-knows-what, and thought, “Ugh, that’s a mess.” I’ve done it a hundred times. Once, I passed a wooden side table three times at a yard sale—each time thinking, “Why would anyone buy that?”—before I stopped. Really stopped. And realized… that mess? It’s a blank canvas.
Furniture flipping isn’t just about saving cash (though hello, that’s a huge win—who doesn’t love getting a “new” piece for pennies?). It’s about taking something forgotten—something that might’ve been tossed aside—and turning it into a piece that feels yours. The kind that makes you smile when you walk into the room, because you know the story behind it. The best part? You don’t need to be a pro. I’ve had my share of mishaps—ever tried painting a table without sanding first? Spoiler: It peels. Like, big-time. Don’t do it. But that’s part of the fun. It’s how you learn.
Whether you’re just looking to spruce up one sad side table (we’ve all got one—mine used to hold nothing but remotes and half-empty water cups) or give your whole living room a glow-up, these 15 flips will make you see potential everywhere. From quick paint jobs that take an afternoon to total overhauls that feel like a mini adventure, each one proves that imagination beats a big budget any day. So grab your coffee—maybe a snack, too, because projects always take longer than you think—and scroll through. Let’s get inspired. You might just find your next weekend project.
Tools of the Trade: What You Actually Need (No Fancy Gadgets Required!)
Before we gush over the transformations—seriously, some of these before-and-afters still make me gasp—let’s talk tools. I used to think you needed a garage full of expensive gear to flip furniture. Like, sanders that cost more than my first car, or fancy paintbrushes that came in a velvet case. Then I tried it. Spoiler: You don’t. Just the basics. And maybe a little patience. Okay, a lot of patience if you’re sanding by hand (trust me on that one). Here’s what’ll set you up for success:
- Sandpaper or a sander: Skip the sandpaper if you can. I once sanded a vintage desk by hand, and my forearms felt like I’d lifted weights for a week. Not fun. An electric sander? Game-changer. It saves time, saves your arms, and gets the job done smoother. Worth every penny.
- Primer and paint: Primer’s non-negotiable. I know, it feels like an extra step—like waiting for bread to toast when you’re starving—but it makes the paint stick. No primer = repainting in a month. I’ve been there. Waste of time, waste of paint, waste of my Sunday. And chalk paint? Perfect for beginners. It goes on smooth, dries fast, and gives that cozy matte look everyone loves. I once painted a dresser with chalk paint and finished it in an afternoon. Felt like a DIY hero.
- Brushes and rollers: Get a good brush for details—like chair legs or small drawers—and a roller for big surfaces (dressers, tables). Cheap brushes? Total nightmare. They leave streaks that won’t go away, and you’ll end up repainting twice. Spend an extra $5. Trust me, it’ll save you frustration later.
- Screwdrivers and wrenches: Small, but mighty. Swapping out old knobs for new ones is like giving furniture a mini makeover—no paint needed. I once took a $10 dresser from a thrift store, swapped the ugly plastic knobs for $2 gold ones, and suddenly it looked like it belonged in a boutique. Magic.
- Upholstery tools: If you’re tackling chairs or sofas, grab a staple remover (not a butter knife—again, learn from my mistakes. I ruined a butter knife and still couldn’t get the staples out) and a fabric staple gun. They’re cheap, and they make reupholstering way less scary.
Investing in decent tools doesn’t mean breaking the bank. Most of this stuff you can find at a hardware store for under $50. And once you have them? You’ll use them for every flip. Now, let’s get to the good stuff—the transformations!
1. The Vintage Chair Revival: Timeless Elegance Meets Modern Comfort
Before: Picture this: An old armchair, covered in faded floral fabric that looks like it’s from the 70s. It was sitting in the corner of a thrift store, collecting dust, and when you sat on it? It creaked like it was complaining. I almost walked past it—until I ran my hand over the wood frame. Solid as a rock. Just… neglected.
After: Now imagine that same chair, reupholstered in rich emerald green velvet. Soft, luxe, the kind of fabric that makes you want to curl up with a book and never move. The wood frame? Sanded smooth, no more scuffs. We added brass studs around the edges—tiny little things, but they make it look like “I spent way more than I did.” It’s now the star of my reading nook, next to a small side table and a lamp that casts the warmest light. I sit there every night with my tea. It’s my happy place.

Here’s how to do it: First, yank off the old upholstery. This is messy—dust bunnies galore!—but so satisfying. Like peeling off a band-aid, but way more rewarding. Sand the wooden frame until it’s smooth—no splinters, please. Then pick fabric that makes you happy. Velvet, linen, whatever speaks to you. I found my emerald velvet on sale at a fabric store; it felt like petting a cloud. Reupholster it (take your time—no rush), then add those brass studs with a small hammer. Finally, plop it in a cozy spot with a lamp and a stack of books. This chair will go from “meh” to “must-sit” in no time.
2. From Drab to Fab: The Dresser Makeover
Before: A wooden dresser that’s seen better days. The paint was chipped, one handle was missing, and it was covered in my kid’s sparkly unicorn stickers—you know the ones, the ones that refuse to come off. It lived in the guest room, hiding in the corner because it was so ugly. I almost donated it. Then I thought, “What if?”
After: That same dresser, now painted matte black. Sleek, modern, totally chic. We swapped the old knobs for gold ones—$2 each at a home store!—and styled the top with a small vase of flowers (from my backyard, free decor!) and a stack of vintage books I found at a flea market. Now it’s the first thing guests notice when they walk in. No more hiding.
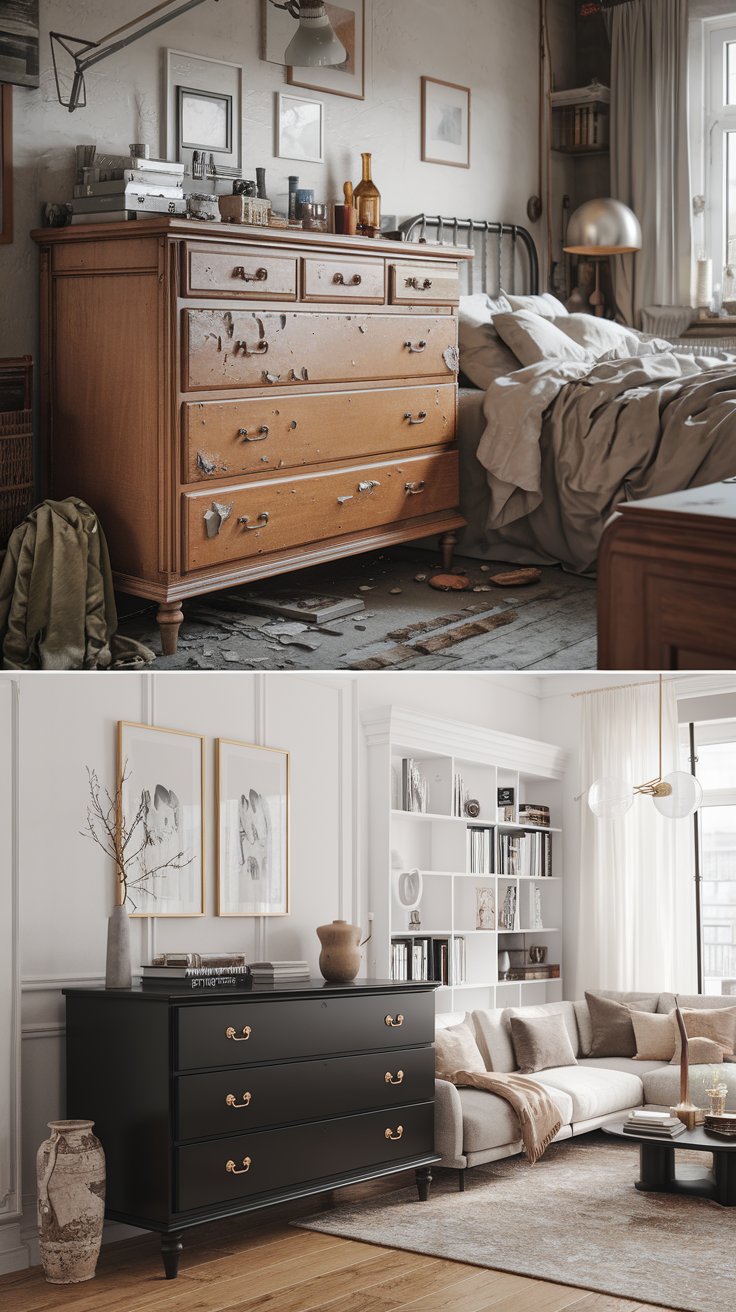
Dressers are my favorite flips—they’re so versatile. Start by sanding off the old finish (this takes 30 minutes, tops). I used a hair dryer to get those unicorn stickers off—pro tip right there. Apply a coat of primer, then paint. Chalk paint works here too, but I went with matte black latex because let’s be real, this dresser’s gonna see some wear. Kids, guests, whoever—latex holds up better. Then swap the hardware! That’s the secret sauce. A $10 pack of gold handles can turn a sad dresser into something that looks like it came from a boutique. Style it with a few pretty things, and boom—done.
3. The Coffee Table Comeback: Scandinavian Simplicity
Before: A coffee table that was scratched all over—thanks, my dog Max, who thinks coffee tables are his personal chew toy. The finish was dull, and it was so boring it blended into the carpet. It was just… there. Taking up space, not doing anything. I’d put my coffee on it, but that was about it.
After: A two-tone stunner: white top, natural wood legs. Bright, clean, feels like it belongs in a Pinterest post (and let’s be real, I took a million photos of it). We styled it with a woven tray—to corral remotes, game-changer!—a few candles (the ones that smell like vanilla, my favorite), and a stack of magazines. Now it’s not just a place to put your coffee. It’s a focal point.
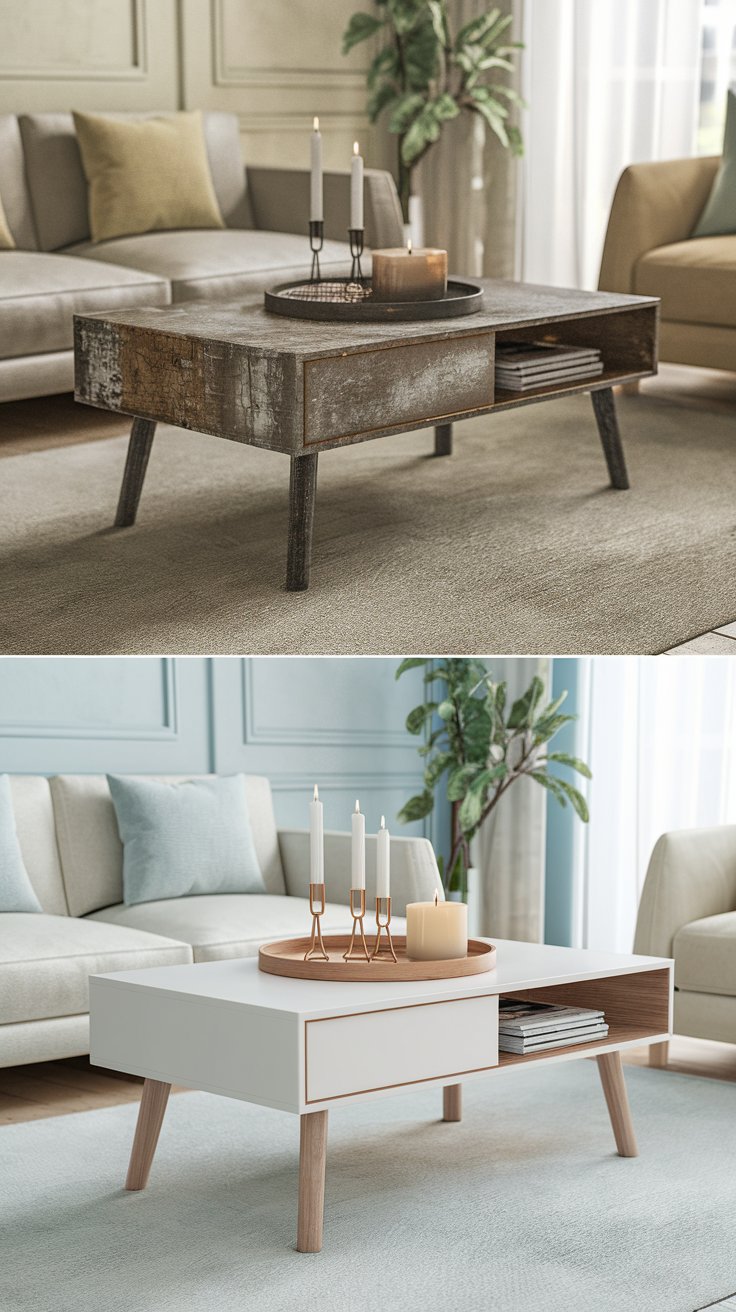
Two-tone furniture is my weakness. It’s so easy, but it looks so put together. Sand the table first—get rid of those dog scratches (sorry, Max). Then tape off the legs with painter’s tape—no messy edges, please. Paint the top white (I used a high-gloss for easy cleaning—hello, coffee spills!). Leave the legs natural. If the wood looks dry, add a coat of wood conditioner to make it shine. Style with a tray to keep things tidy—remotes, coasters, all that stuff that usually clatters the top. Pro tip: This works for end tables too! I did my end table last month, and it matches the coffee table now. My living room feels so cohesive.
4. The Boho Bench Transformation: Earthy and Inviting
Before: A plain wooden bench—no character, no style, just a slab of wood on four legs. It lived in the hallway, collecting shoes and my kid’s random backpacks. Every time I walked past, I’d think, “This could be better.” But I never did anything about it. Until one rainy Saturday.
After: A boho dream. We replaced the seat with woven rattan—so trendy, so cozy—and painted the legs soft sage green. Now it’s topped with a fuzzy throw pillow (from Target, $10!) and a small potted succulent (the kind that’s hard to kill—perfect for me). It’s no longer a shoe holder. It’s a spot where you can sit and take off your shoes in style.
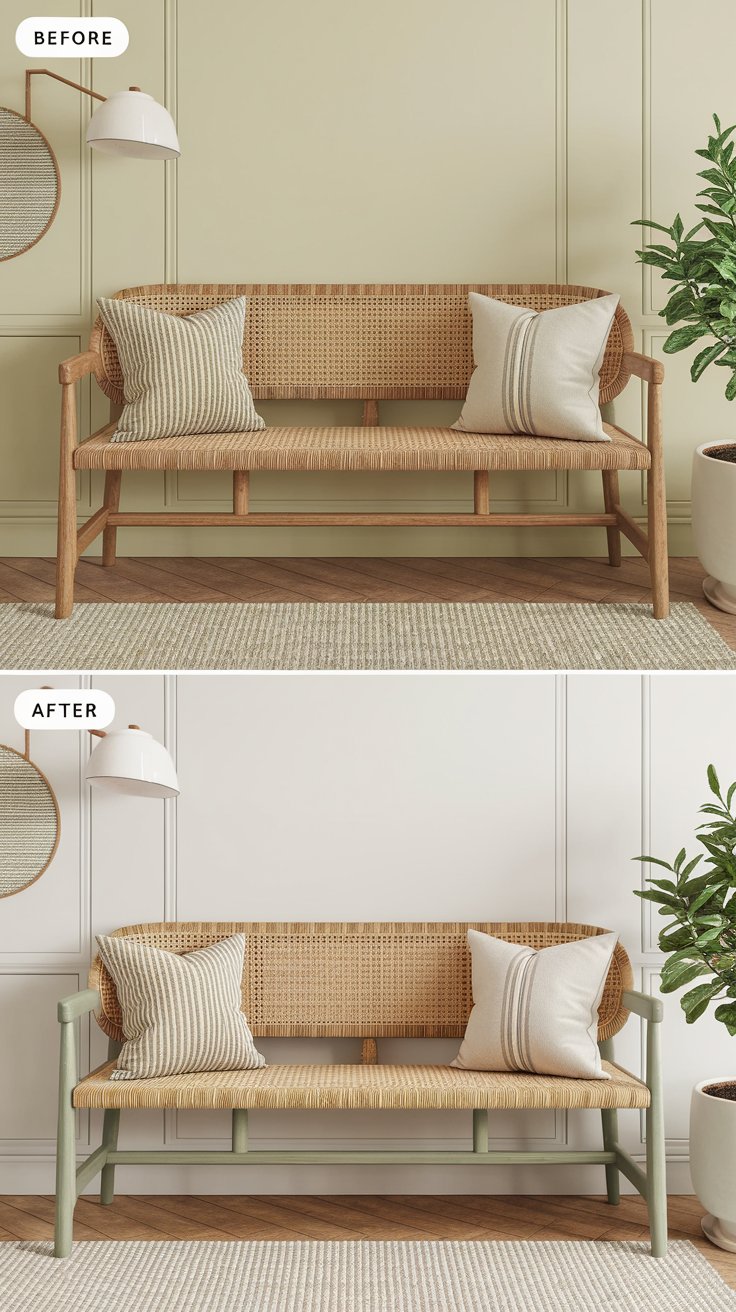
Rattan is everywhere right now, and for good reason—it adds warmth without trying. My sister has a rattan basket in her entryway, and I’ve been wanting to use it somewhere… so the bench was the perfect excuse. To do this: Remove the old seat (usually just a few screws—easy peasy). Cut a piece of rattan to fit (you can find it at craft stores or online). Staple it to the frame—go slow, make sure it’s tight. Paint the legs sage green (or any earthy tone—moss, terracotta, whatever fits your space). Add a pillow and a plant, and suddenly your hallway feels like a mini retreat. Bonus: Rattan is easy to clean—just wipe it down with a damp cloth. Perfect for busy hallways.
5. The Nightstand Nook: Minimalist Serenity
Before: A mismatched nightstand—peeling paint, wobbly legs, and it was way too tall for my bed. It held a lamp that’d been there since college—plastic, ugly, but it worked. Every night, I’d set my book on it and think, “I need to fix this.” But I never did. Until I had a bad day and decided to rearrange my bedroom.
After: A sleek, gray nightstand—smooth, sturdy, the perfect height. We sanded off the old paint, added a fresh coat of soft gray (it’s called “Cloudy Sky”—so calming), and swapped the old knob for a simple silver one. Now it has a modern lamp (soft light, no harsh overheads), a tiny potted fern (fingers crossed it lives), and a stack of my favorite bedtime books. My bedroom feels calmer already. I sleep better here now.
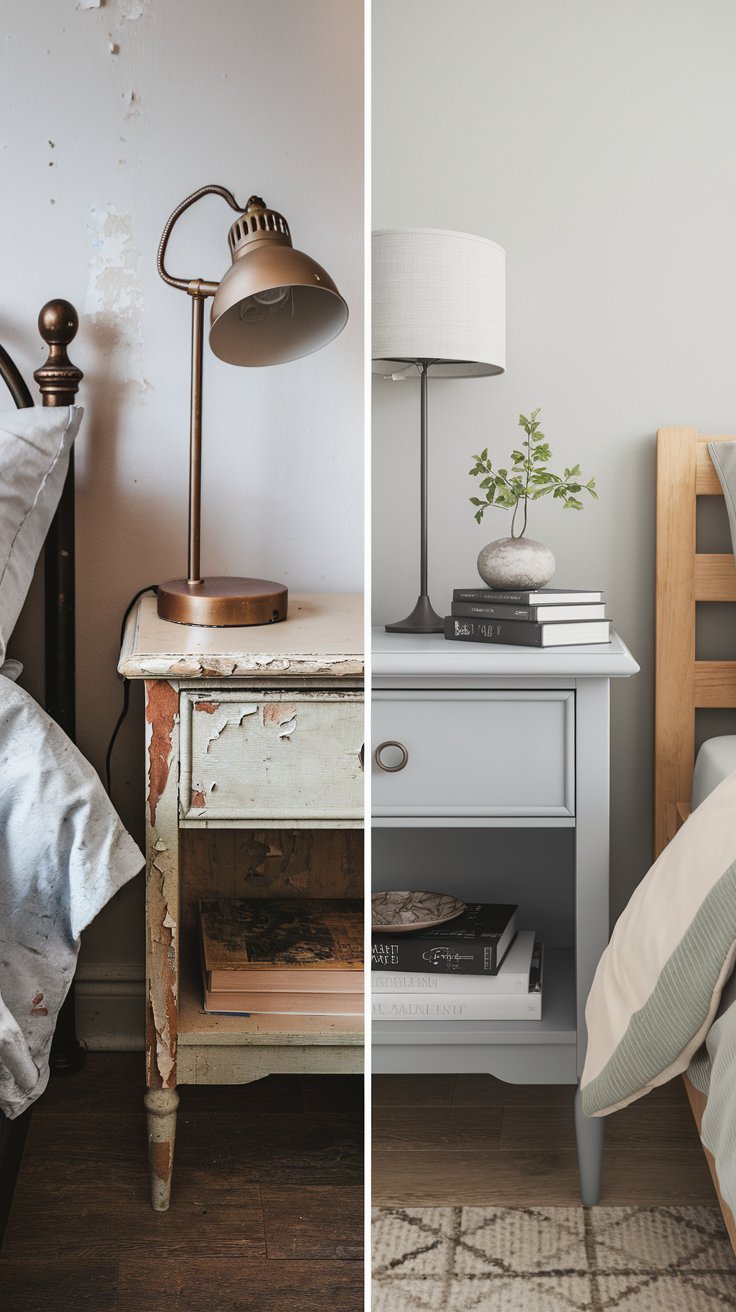
Nightstands are small, but they make a big difference. Your bedroom should feel like a sanctuary, right? A scuffed nightstand doesn’t exactly scream “relax.” Start by fixing the legs—tighten screws or add new ones if they’re wobbly. I had to replace one leg on mine; it was so wobbly the lamp kept falling over. Sand the paint until it’s smooth, then paint it a calming color (gray, beige, light blue—something that makes you breathe easier). Swap the hardware for something simple, then style with a lamp that gives soft light and a small plant. Trust me, your bedtime routine will feel fancier. I now look forward to putting my book down on it every night.
6. The Farmhouse Table Flip: Rustic Charm
Before: A dark wood dining table—scratched, sticky (gross, I know), and it made our small dining room feel even smaller. We avoided using it because it was so depressing. We’d eat on the couch instead, which is fine, but sometimes you want to sit at a table.
After: A rustic farmhouse table—whitewashed top, natural wood legs, and it brightens the whole room. We set it with woven placemats (from a flea market, $5 for a set!) and a centerpiece of wildflowers—picked from the backyard, free decor! Now we eat dinner here every night, not just on special occasions. It feels like a family spot now.
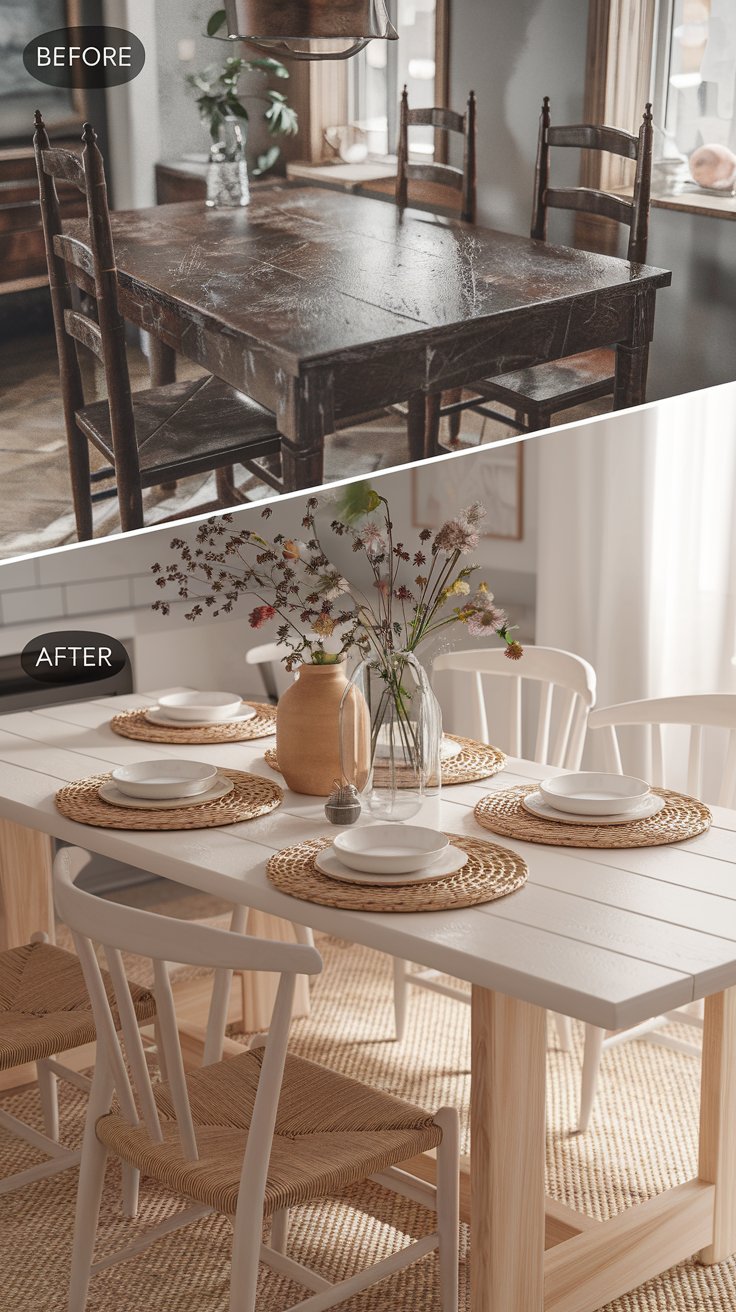
Whitewashing is easier than it sounds—I promise. I was scared to try it at first, thought I’d mess it up. But no. Mix equal parts white paint and water (use latex paint for durability). Sand the table first—get rid of that sticky grossness. Then brush on the mixture. Wipe it off with a rag right away—this gives it that “weathered” look, not a solid white coat. Leave the legs natural, or add a coat of wood stain to make them pop. Style with simple placemats and fresh flowers (even dandelions look cute here!). Suddenly your dining room feels cozy and welcoming. We had my parents over last week, and my mom kept saying, “This table is beautiful.” Made my day.
7. The Glamorous Vanity: Luxe and Lovely
Before: An old vanity—chipped paint, a cloudy mirror, and it was cluttered with makeup brushes and old lipsticks (the ones I forgot I had, yikes). It lived in the bathroom, but I never used it because it felt messy. I’d do my makeup on the bathroom counter instead, which is fine, but it’s not the same as a vanity.
After: A glamorous vanity—painted blush pink, with gold accents and a new mirror. It’s organized: brushes in a pretty jar (thrifted, $2), lipsticks in a tray, and a vase of fresh roses on top (from the grocery store, $5). Now I actually enjoy doing my makeup here—it feels like a little spa day every morning.
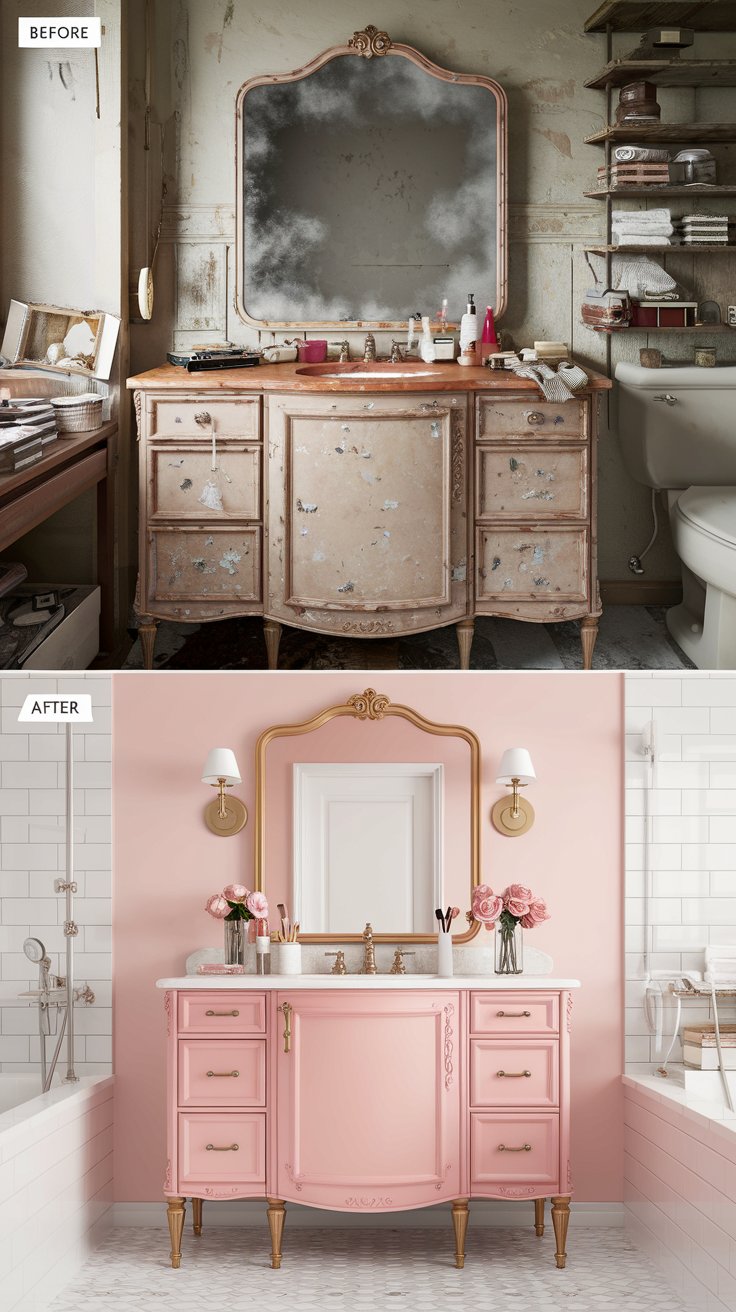
Glam doesn’t have to be expensive—this vanity cost me $30 at a thrift store. Sand the old paint, then paint it blush pink (I used a satin finish—shiny but not too much). Add gold hardware—knobs, hinges, even a gold trim around the mirror if you’re feeling fancy. I added gold trim; it was so easy, and it made a huge difference. Replace the mirror if it’s cloudy (you can find cheap ones at home stores). Organize your makeup with pretty containers—no more clutter. Fresh flowers are optional, but they make every morning better. I pick up roses every Sunday now; it’s my little weekly treat. Trust me, you’ll want to linger here.
8. The Industrial Bookshelf: Edgy and Functional
Before: A wobbly bookshelf—particle board, outdated, and it was so flimsy I was scared to put heavy books on it. It was cluttered with old textbooks and random trinkets (the ones you keep but never look at). It lived in the kitchen, and it was an eyesore.
After: An industrial-style bookshelf—reclaimed wood shelves, metal brackets, and it’s sturdy enough to hold all my cookbooks. We styled it with books (organized by color—yes, I’m that person), a few small plants, and a vintage camera (my dad’s old one!). Now it’s the focal point of the kitchen, not an eyesore.
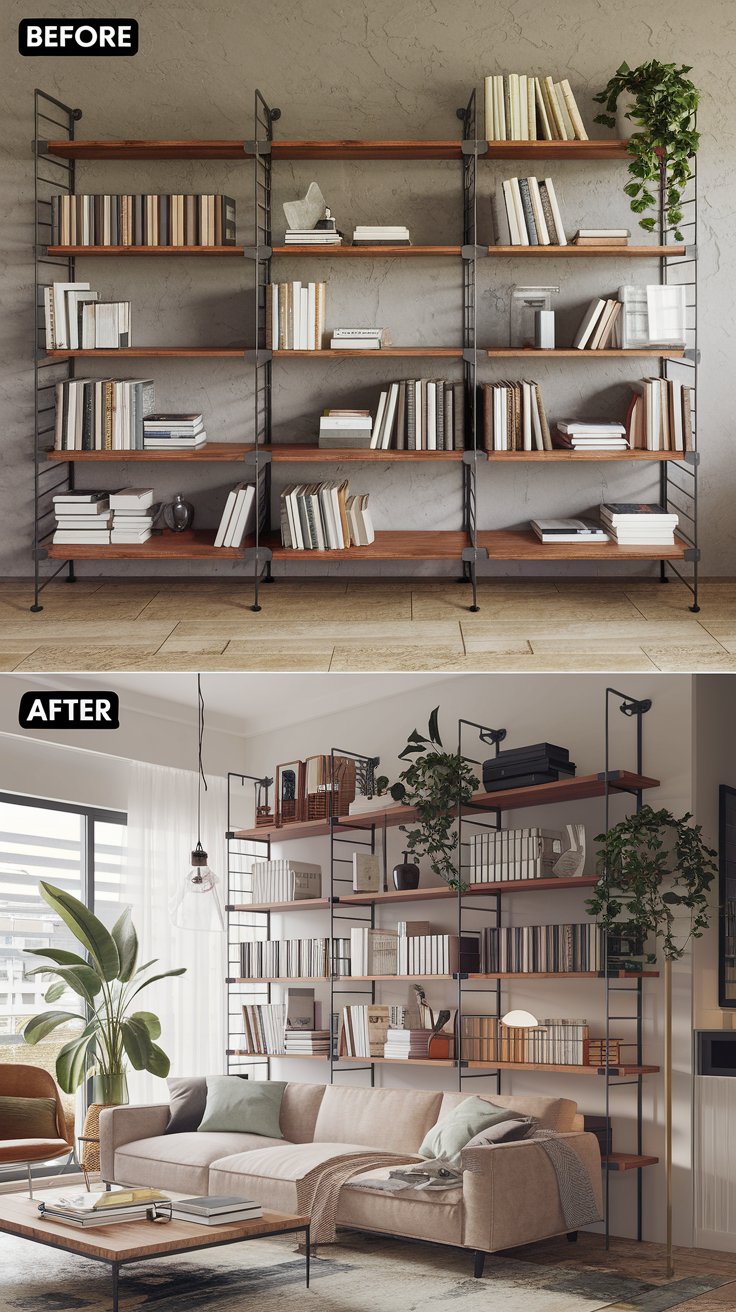
Industrial style is all about mixing wood and metal—and it’s so easy to DIY. If your old bookshelf is flimsy, replace the shelves with reclaimed wood. I found mine at a hardware store for $15; it had scratches and knots, but that’s part of the charm. Add metal brackets for support—they’re cheap and make the shelf look tough. Paint the frame black if you want, or leave it metal for that raw look. I left mine metal; it matches my kitchen appliances. Style with a mix of books, plants, and decor—don’t overcrowd it. Less is more here. Pro tip: Reclaimed wood has character—scratches and knots are part of the story, so don’t sand them out! My bookshelf now holds all my favorite cookbooks, and I actually use them more because I can see them.
9. The Coastal Console Table: Beachy Bliss
Before: A dark, heavy console table—took up half the hallway, made the space feel cramped, and it was covered in mail and keys. It was just a catch-all. Every time I walked past, I’d think, “I need to clean this,” but I never did. Until I went on vacation and saw a coastal house with a light, airy console table. I came home and decided to fix mine.
After: A light, airy console table—painted white with a distressed finish, styled with a woven basket (for mail!), a small lamp, and a jar of seashells I collected on vacation. Now the hallway feels bright and beachy, even though I live miles from the ocean. It’s like a little piece of vacation in my house.
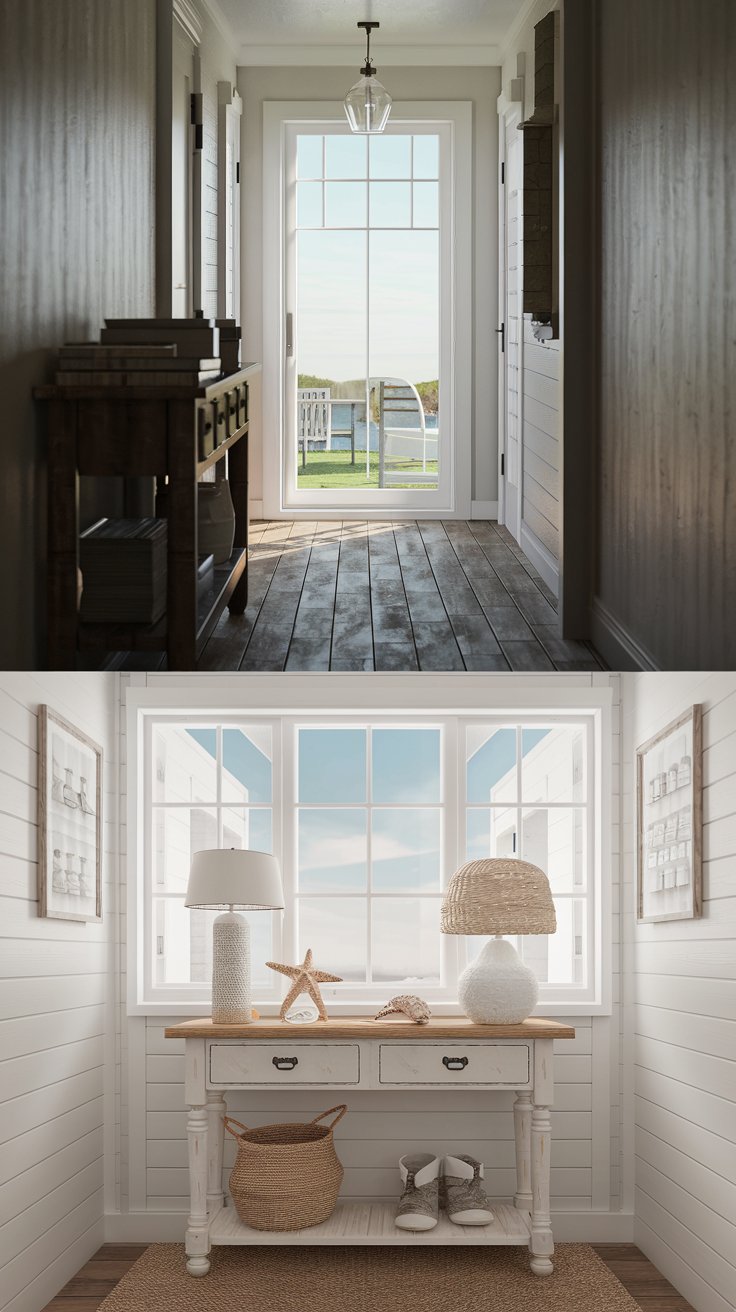
Coastal style is all about light colors and natural textures—perfect for making small spaces feel bigger. Start by painting the console table white (use a flat finish for that beachy, worn look). Then distress it: Sand the edges and corners with sandpaper until the wood underneath peeks through. This makes it look like it’s been sitting on a beach for years (in a good way). I distressed mine a little too much at first—oops—but it still looks good. Style with a woven basket to hide clutter (mail, keys, all that stuff), a lamp for soft light, and seashells or driftwood for that ocean vibe. I collected my seashells on a trip to Florida; every time I look at them, I remember the beach. Suddenly, your hallway feels like a vacation spot.
10. The Mid-Century Modern Sideboard: Retro Vibes
Before: A bulky sideboard—dull finish, curved legs that were out of style, and it was so big it dominated the dining room. We used it to store dishes, but it wasn’t pretty. Every time we had guests, I’d try to hide it with a tablecloth. Not ideal.
After: A sleek mid-century modern sideboard—walnut finish, tapered legs, and it fits perfectly in the space. We styled it with a vintage record player (my dad’s old one!) and a few retro decor pieces (a lava lamp, yes, I love it). Now it’s not just a storage piece—it’s a conversation starter.
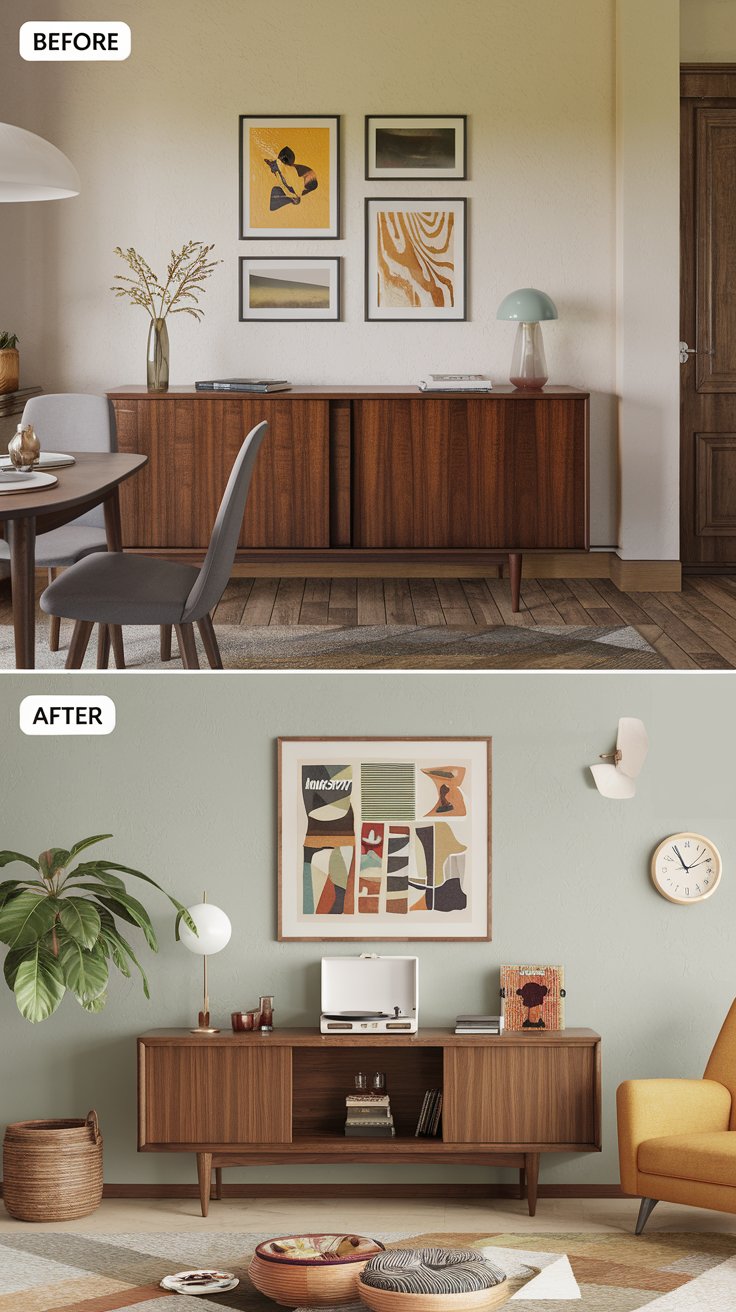
Mid-century modern is back, and it’s not going anywhere. I’ve always loved the look—sleek, timeless. The key here is the legs—tapered, slim, and stylish. If your sideboard has clunky legs, replace them with mid-century style ones. I found mine online for $20; they were easy to install. Sand the surface, then stain it walnut (or oak, if you prefer) to get that rich, retro look. I stained mine twice to get the color just right—patience pays off. Style with vintage pieces—record players, old cameras, or mid-century inspired vases. I borrowed my dad’s record player; he was so happy I was using it. This flip takes a little more time, but the result is so worth it. Your dining room will feel like it’s straight out of a 1960s magazine (in the best way).
11. The Rustic Headboard: Cozy and Inviting
Before: A plain headboard—metal, boring, and it felt cold against the pillows. The bedroom was functional, but not cozy. I’d lay in bed and think, “This bed needs something.” But I never knew what. Until I saw a reclaimed wood headboard online.
After: A rustic headboard made from reclaimed barn wood—rough around the edges, full of character, and it makes the bed feel like a warm hug. We paired it with fuzzy bedding (from Target, so soft!) and string lights above. Now I look forward to going to bed every night.

Reclaimed barn wood is my favorite material—it has so much history. I found mine at a local lumber yard; the guy told me it was from a barn that was 100 years old. How cool is that? To make this headboard: Cut the wood planks to fit your bed (king, queen, whatever). Sand them slightly—don’t remove all the scratches; they’re part of the charm. Stain them with a light brown or leave them natural. I left mine natural; I love the wood color. Attach them to a frame (you can use 2x4s) and mount it to the wall or the bed frame. Add cozy bedding and soft lighting—string lights work wonders here. I put string lights above mine; they’re on a timer, so they turn on at dusk. This headboard turns a plain bed into a focal point, and it’s so easy to make. You don’t even need to be good at woodworking—just a saw and a drill. I messed up one cut, but it’s not noticeable. Trust me, imperfections are okay.
12. The Scandinavian-Inspired Desk: Minimalist Productivity
Before: A cluttered desk—old papers, broken pens, and a finish that was peeling. It lived in the home office, but I avoided working here because it was so messy. I’d work on the couch instead, which is fine, but it’s hard to focus when the TV’s on.
After: A minimalist Scandinavian desk—clean lines, light wood finish, and it’s organized (thanks to a desk organizer!). We styled it with a sleek lamp, a small cactus (hard to kill—perfect for me), and a few notebooks. Now I actually want to work from home.
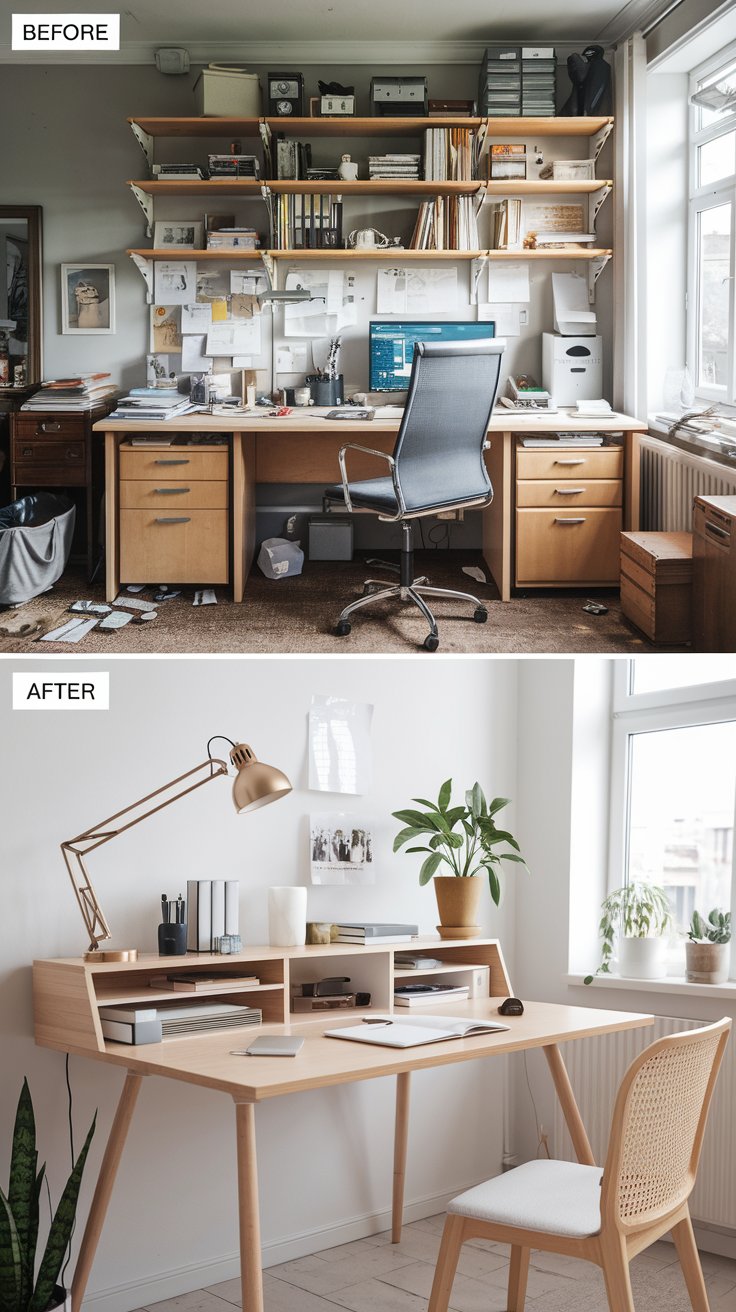
Scandinavian style is all about simplicity and functionality—perfect for a desk. Start by clearing off all the clutter. Throw away old papers, recycle broken pens—you’ll feel better, I promise. I filled a whole trash bag with stuff I didn’t need. Sand the desk until it’s smooth, then stain it with a light wood color (ash or pine works great). I went with pine; it’s bright and clean. Add a desk organizer to keep things tidy—pens, paperclips, all that small stuff that usually gets lost. Style with a lamp that has a simple shade (no frills), a plant that’s hard to kill (cacti, succulents—mine’s a cactus, and it’s still alive after 3 months!), and a few notebooks. A clean desk = a clear mind, right? I’ve noticed I get more work done now that my desk is organized. This flip takes an hour, and it’ll change how you work. Trust me, your future self will thank you.
13. The Art Deco Bar Cart: Glamorous Entertaining
Before: A plain metal bar cart—no style, no personality, and it was hiding in the corner. We used it to store extra bottles, but it wasn’t pretty. Every time we had parties, we’d bring it out, but it felt like an afterthought.
After: A glamorous Art Deco bar cart—glossy black paint, gold accents, and mirrored shelves. It’s styled with crystal glasses (thrifted, $1 each!), a cocktail shaker, and a small vase of flowers. Now we use it for parties, and everyone compliments it.

Art Deco is all about glitz and glamour—perfect for a bar cart. I love hosting parties, so this flip was a no-brainer. Start by painting the cart glossy black. Use spray paint for a smooth finish—just do it outside, please. I sprayed mine in the driveway, and my neighbor stopped to ask what I was doing. I told her, and she now wants to flip her own cart. Add gold accents: Tape off the edges and paint them gold, or add gold hardware. I painted the edges gold; it was so easy, and it made the cart pop. Replace the shelves with mirrored glass (you can cut it to size at a hardware store) for that luxe look. Style with crystal glasses (thrift stores have great ones—just wash them well!), a cocktail shaker, and a few pretty bottles. This cart turns a simple drink into a fancy experience. Pro tip: Add a small tray on top to corral glasses—no spills! I did that, and it’s saved me from a few disasters.
14. The Shabby Chic Side Table: Vintage Charm
Before: A scratched wooden side table—outdated design, dull finish, and it was next to the sofa collecting remotes and cups. It was just… there. I’d look at it every night and think, “This could be cute.” But I never did anything about it. Until I found a pastel blue paint at the hardware store.
After: A shabby chic side table—painted soft pastel blue, with distressed edges, styled with a vintage lamp (found at a yard sale for $5!) and a stack of old books. Now it’s a cute little spot next to the sofa, and it adds so much charm to the living room.
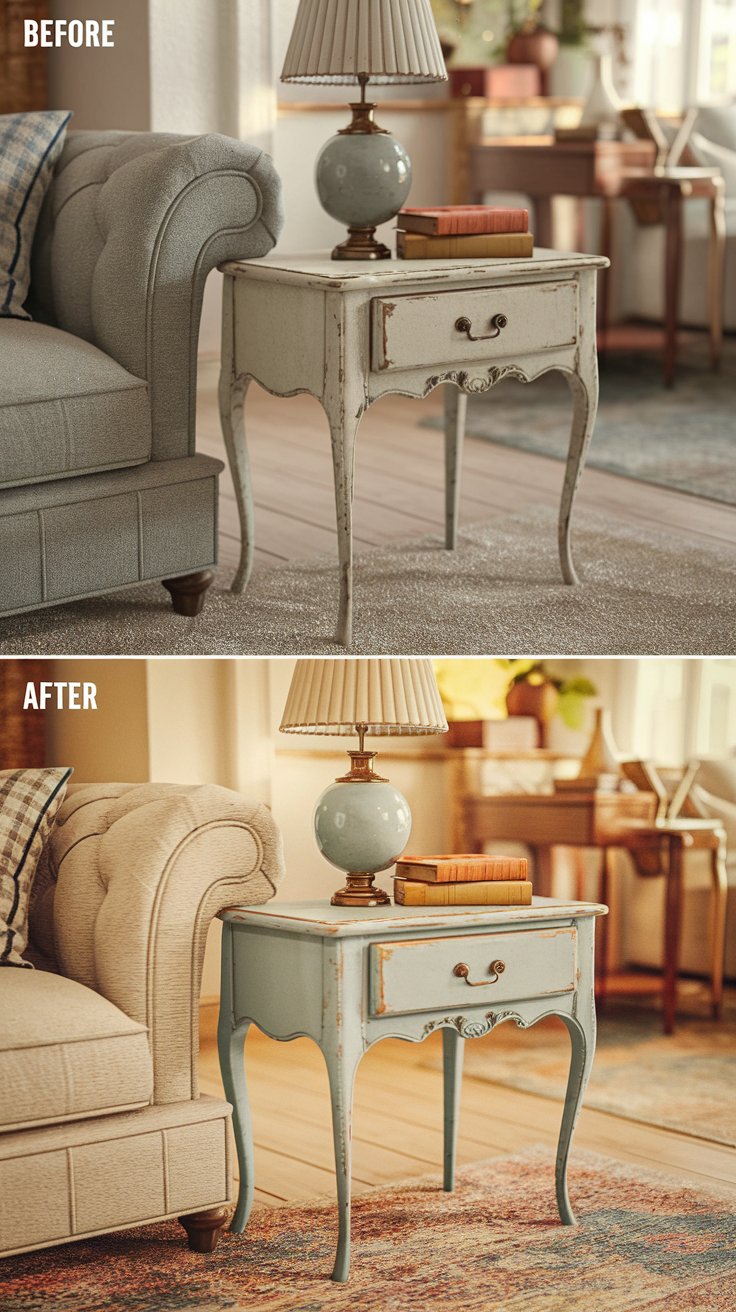
Shabby chic is all about vintage charm—soft colors, distressed edges, and a cozy feel. To do this: Sand the side table—get rid of those scratches. Then paint it a soft pastel (blue, pink, mint—whatever you love). I went with pastel blue; it matches my sofa. Once the paint is dry, distress it with sandpaper—focus on the edges and corners, where furniture naturally wears. This makes it look like a vintage treasure. I distressed mine a little more than planned, but it still looks good. Style with a vintage lamp (thrift stores are goldmines for these—just make sure it works!) and a stack of old books (even if you don’t read them—they look cute). I found my vintage lamp at a yard sale; the lady selling it said it was from the 50s. This flip is so easy, even a beginner can do it. And it turns a boring side table into something special. Every time I set my cup on it, I smile.
15. The Modern Farmhouse TV Stand: Rustic Meets Modern
Before: A bulky dark TV stand—takes up too much space in the small living room, and it’s so heavy I can’t move it. It held the TV, but that’s it. I’d look at it every night and think, “This is just a big black box.” Not exactly inspiring.
After: A modern farmhouse TV stand—light wood finish, sliding barn doors, and it has so much storage. We styled it with the TV, a few candles, and a potted snake plant (another hard-to-kill one!). Now the living room feels open and cozy, not cramped.
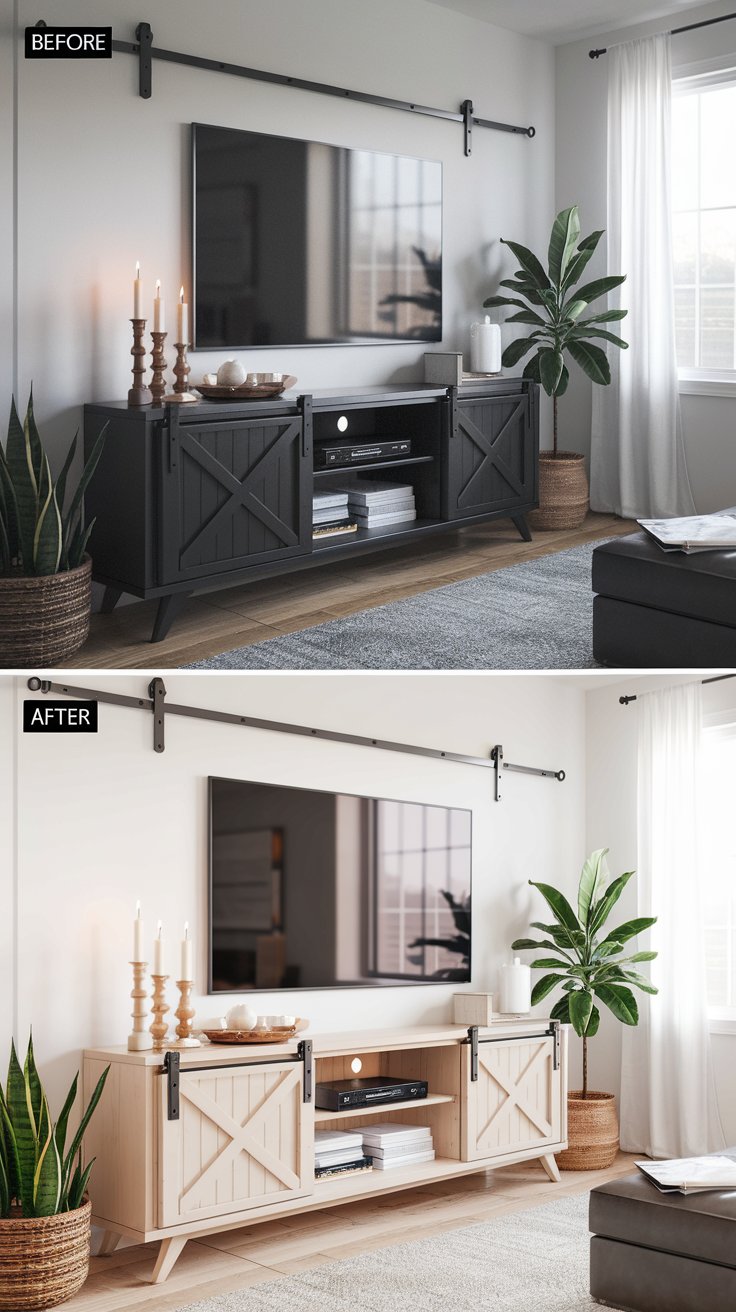
Modern farmhouse is the perfect mix of rustic and modern—cozy but not cluttered. The key here is the sliding barn doors. I’ve always loved barn doors; they’re so fun. If your TV stand has regular doors, replace them with barn doors. You can buy kits online or make your own with plywood. I made my own; it was easier than I thought. Paint or stain the stand light wood (whitewash works here too) to brighten the space. I whitewashed mine; it made the living room feel bigger. Add storage inside—baskets for remotes, DVDs, all that stuff. I have a basket for remotes; no more losing them in the couch cushions. Style with candles for warmth and a plant for life. This TV stand turns a functional piece into something that ties the whole room together. And sliding doors? They’re so fun to use—trust me, I play with them every time I walk by. My kid does too; it’s become a little game.
Conclusion: It’s Not Just Furniture—It’s Storytelling
Furniture flipping isn’t a trend. It’s a way to make your home feel like you. Every piece you flip has a story—where you found it, the time you spent on it, the little mistakes you made (like that paint drip I mentioned earlier, the one that’s still on the bottom of my dresser). And when you’re done? You have something that no one else has.
You don’t need a big budget, fancy tools, or years of experience. All you need is a little creativity and the willingness to try. I’ve flipped furniture that cost me $5 and turned it into something I’d pay $200 for. And the best part? Every time I look at it, I smile—because I made it. I put my hands on it, I fixed it, I gave it new life.
So next time you see a beat-up chair at a thrift store or a dusty dresser in a garage sale, don’t walk past it. Stop. Look. Imagine what it could be. Because that old piece? It’s not just furniture. It’s an opportunity to create something beautiful.
Happy flipping, friend—can’t wait to see what you make.
上一篇
12 Eye-Catching Insta Story Layout Ideas That Will Make Your Followers Double Tap!
下一篇
Discover the Top 15 Nail Colors for 2025 That Will Make You the Trendsetter!
Loading...